Monday, July 24, 2017

Preserving Memories

The past couple of weeks has got me thinking about memories, I love capturing memories with my camera but also love looking at memories from the past in pictures. My grandfather and aunt loved taking pictures and we have boxes of pictures and even slides piled high in the basement. With the recent passing of my grandmother and Jamie's brother I have again started to think about preserving memories and ways to share them.

To preserve our most recent memories I love using ChatBooks. The app is connected to my Instagram account and is easy to use. By hashtaging my pictures ChatBooks creates a series for each kiddo and mails me the book every 60 pictures. They email 2-3 days before they print the book so I can edit it if I want. I also have a series for all of my Instagram pictures.

The books are 6x6 and are so easy to keep in a basket. Jamie and I often pull the basket down and just flip through them. Henleigh loves to pull the basket off the shelf and will point to herself on the cover.


I love this idea for storing them too. Now if I could just find pineapple book ends all would be complete. 😉
image taken from Pinterest

Want to start preserving your memories with ChatBooks click HERE to get your first book for FREE!!

I take thousands of pictures each year. Not all I post on Instagram, instead of leaving them on my computer to only be viewed by those who log into the computer I create Blurb books that I will then print and add to our book shelf in the living room. I will often put them on end tables when guest come to visit so that they can flip through them and see our adventures. Again each kid has their own book. With 3 kiddos I don't have time to go through every picture at the end of the year and pick which ones I want in a book. Adobe Lightroom makes it very easy to tag pictures when I download them and will sort them into books based on how they are tagged. Can you say TIME SAVER!!! I love these books and love looking back at the memories we made as a family.

Memories from the past are also dear to my heart. Stay tuned for how I preserve those memories and share them with family and friends.

Sunday, July 16, 2017

First Camping Trip as #LahockiPartyof6

This weekend was our first family camping trip with four adults (Mom, Dad, Jamie, & myself), a 14-month-old and 2 one-month-old twins! We decided to go somewhere familiar, so we went to Island Resort Campground in Newark, Maryland. Island Resort is our go to campground because it is fairly inexpensive and close to Assateague so we can go four wheeling. Most of the time when we camp we don't stay at the campground much we are off doing other things, but this time we just hung around camp.


This trip was our trial run for our week long trip to Hatteras in August. The heat index on Thursday and Friday was extremely hot, which was good and bad. Good in the respect that it will be very hot in Hatteras, so we got an idea of what the weather could be like. Bad in the respect that we have 3 kids under the age of 2. Henleigh spent most of her time in the kiddie pool (or the campground pool) and the boys stayed in the "MC" until later in the afternoon. The weather on Saturday cleared off and the breeze was awesome!!


Both Thursday and Friday we had some wicked storms that left our dome awning looking like this.


The first time the wind picked up the awning and the fold-able table that was inside. The second time the wind picked up the awning and threw it down. So we just moved the table to the outside until the stormed passed. We determined that we need to buy more/different stakes. Here is what we bought.


screw stakes,

and gutter screws with fender washers. We took off the gray "sleeve" on the screws, added the washer and drilled them into the ground. So simple and can I say easy.

Inside the camper we had everything pretty well organized and had what we needed. It was setting up and taking down that we found we needed more organization and "gadgets". Hence the create organizer we added to the amazon cart. Inside we plan on keeping the stakes, spray nozzle for the hose, maybe some small blocks for the jacks, and most importantly the drill!!

Sleeping/Napping was something else on my mind before this trip. Ahead of time I had Jamie remove the table inside the camper which made a great spot for Henleigh to sleep.  We covered the floor with a camp mat and figured it would be like her crib of sorts.  It didn't work out that way...at first she didn't want to lay down there and it didn't have four walls so she kept crawling out so I laid with her in one of the big beds until she fell asleep and moved her.  That was good until the first storm came and she woke up.  From there I just slept with her in one of the big beds. Our plan is to revisit her sleeping arrangements before our next trip, thinking crib rail.  For the boys we planned on having them sleep in their boppy pillows on the big bed with us which worked out perfectly.  The problem came napping.  The a/c unit didn't run well in the heat of the day so they had to nap in the "MC", but they didn't want to nap.  All they wanted was to be held and it was too HOT to do this outside so Jamie or I spent quite a bit of time in and out of the "MC" with the boys. Oh and Henleigh napped in a pack-n-play in the "MC".

Overall it was great to get away and we learned lots.

Monday, July 10, 2017

I think I am addicted...

So it's no surprise that with three kids I have become slightly addicted to caffeine more specifically coffee; Dunkin' Donuts iced coffee the ones in the bottles you can buy at Target or the grocery store. But at $2.50 each it was becoming a very expensive habit.


So I have decided that I'm going to start making ice coffee at home. I mentioned this to Amanda, she told me about this fabulous kitchen gadget. So in the amazon cart it went and it arrived last week. I have made three batches of ice coffee. It is not as good as the Dunkin' Donuts Coffee but it is definitely cheaper.


Here is the recipe I used...3 cups of water in a mason jar. Fill the mesh strainer with 3/4 of a cup of ground coffee. Put the strainer inside mason jars screw on the lid and let it sit overnight. The next morning I added a half a cup of half-and-half and you can do either a third a cup of sugar or I did 3 tablespoons of agava nector. Mix it all together and pour over ice.


Now the first day I had about half of the mason jar. (Don't judge) It wasn't the same as the Dunkin but it was still good. I do have to say that the next day it was better, all the ingredients got to merry together. So I suggest making a couple batches ahead of time. Or use a bigger jar ;-). It keeps for a while when you keep it in the fridge.


Thursday, July 6, 2017

Obsessed!!! with Google Classroom

As many of my coworkers can tell you I became obsessed with Google Classroom this spring!! Not only did I become obsessed my students were also obsessed. They would come in each morning and rush to unpack so that they could login to the computer and see if they had a new assignment.  They loved telling me that they had finished everything and got so disappointed when I told them I wasn't adding anything new until the next day.

So for those of you who are ready to try an amazing tool that will not only engage your students but will also make it easy to differentiate then here you go...

How to Set Up Your Google Classroom

1. Go to classroom.google.com. When you log in be sure to use your education account. If your Google log-in is your school email address, you're probably ok.  If not check with your school technology department to see how you can access Google Classroom.  


2. Click on the "+" button in the top right hand corner of your screen to create a class. Then click "Create class". 


3. Add a class name. For example "Mrs. Wright's Kindergarten Class" or "Mrs. Curtis' Passionate Pineapples".  Get creative!! Then click "Create". 


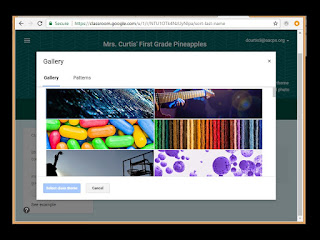
4. Once your class is created, students can start joining it. But I am betting your students aren't sitting right in front of you. So take this time to personalize your classroom. Click "Change class theme" on the right side of the header. It will open a gallery of header images you can use to spice up your classroom. (stay tuned and I will teach you how to create a header of your very own.) 


5. Once your students are in front of you and I suggest doing this in a computer lab or somewhere everyone can be logged into a computer it is time for them to join your class.  Have them log in to Classroom with their school Google account and click the "+" just like you did.  It will prompt them for a class code, which you can them them. Once they enter it, they're in! 

Adding Assignments in Google Classroom

So you have set up your google classroom and are now ready to start adding assignments.  Perfect!!


1. To add an assignment click on the "+" in the lower right hand corner of your classroom.  If you don't see it make sure you are looking at your stream not students or about.


2. From there you get many different option for assignment types.  If you are adding a "slides" document then click "assignment".  This is what I use with my kiddos 90% of the time.


3. From there you need to give your assignment a title. I recommend you number all of your Google Classroom assignments. Start EACH assignment with a number such as #001, #002, etc… This makes is really easy to refer students to the correct spot in Google Classroom. This is also helpful since you are unable to reorder assignments and announcements in the stream. You also can determine who will see this assignment (great for differentiation!!) Finally you need to attach your document that will become your assignment.  You can upload into classroom from your computer, Google Drive, YouTube, or you can even attach a link to an outside website. All of my assignments are stored on Google Drive. 


4. VERY IMPORTANT STEP!!!! Once your assignment is attached you can change how students will view and interact with the document/link.  If I am using "slides" I want each student to have their own copy of the document so that they can manipulate it and not change my original.  In order to do this you need to change the circled drop down box to say "Make a copy for each student".  Then hit assign. 


5. Your assignment will now appear in your stream.


I hope this helps get you started with Google Classroom.  If you have any questions please feel free to comment or send me an email. 

Wednesday, July 5, 2017

Moving to First Grade

It is hard to believe that I finished my 7th year teaching Kindergarten.  Believe me when I say I have learned a lot and have truly grown into the teacher/leader I want to be. If you know me you know that I am never content unless I have a challenge, hence me applying for my National Board Certificate after only 3 years of teaching, going back to school to get my admin certificate while having a baby and being pregnant, and now moving to FIRST GRADE with 3 little ones at home.

Being pregnant with TWINS and preparing to move to first grade wasn't something that I was looking forward too, but the planner that I am started to plan. Step one was cleaning out my cabinets and boxing everything up.  Good thing the neighbor has 3 girls who are always eager to help, so in exchange for me bringing them home they stayed with me after school a couple of days a week. We would take everything out of the cabinet and make piles one that stayed in the room and one that would go to first.  We would label the cabinets "staying" and "first grade" and load everything back into the cabinet.

Once we got closer to the end of school the teachers whose room I was moving into started to clean out her cabinets.  She was the third teacher in this room and had only been in their for one year.  She warned me that nothing was organized and things were just thrown into the cabinets. Most of the cabinets she had never opened.  So before I could move my stuff in I had to organize what was already there.  Again the girls helped me put manipulatives in plastic containers and move thing around so each content area had its own cabinet.  For the bigger stuff and to make things quicker Jamie went to school with me 2 nights and moved the shelves to accommodate my storage bins and move a lot of stuff at one time. He's good like that. :-)

All along my goal was to make it to the end of school year (these boys were going to be born in June)! So I also periodically stood in the middle of my classroom and would take pictures of the room.  Towards the end I would label the pictures with what needed to go to first grade and what was staying.  It turned out to be a 12 page document. The day before school let out I was told that I was dilated 5cm, they didn't send me to labor and delivery but I knew that I needed to move the furniture out of my room (just in case) so my dad went to school with me and moved all of the big stuff into my new room.  I didn't feel comfortable being at school on that last day so I took the day off. :-(  I sent that 12 page document to my co-workers, just in case.  Well those babies didn't come and I got tired of being at home on the couch so I went to work Friday.  In exchange for lunch Caitlin went with me to help me move the last of my stuff. We even had time to put paper on a couple of bulletin boards and move the furniture so I had an idea of the space I was looking at.  Everyone thought I was crazy and they came up with code words if I went into labor.

So it is official I am now a FIRST GRADE TEACHER!!

**sorry this post doesn't have any pictures. i forgot to take some before i left school.  i will update with pictures come august.**

Monday, July 3, 2017

teaching: Woolbur: Lesson on being Different

One of my favorite books to read in the spring is Woolbur by Leslie Helakoski In the story Woolbur is a sheep who is not afraid of being different.  This week we used this book to stress the importance of being different.  Our Morning Meeting are only about 10 minutes a day so we really had to break this lesson up.

Day 1: we read the story. On a side note one of our focus this year is text dependent questions (going along with common core), so with that we created a couple text dependent questions to go along with the story.  1. What is the main idea of the story?  2. How did Woolbur interact with the other characters in the story?  3. How do you think Woolbur's parents felt about him being different?

Day 2: we made a circle map that included all the different ways that Woolbur was different.

Day 3: we made another circle map on ways that we are different.  My kiddos came up with some interesting things that make us different.

Day 4: We did a 4 minute write. Each student had to write 1 or 2 sentences about what made them different.  Then they got into groups based on the shape on the top of their paper and shared what they wrote.  To grab your free copy of the writing paper check out my TpT store.

My kiddos loved this book and really understood that everyone is different and unique.